
|
Safety Emporium for all your lab and safety needs
 The Glassware Gallery
Glassware Joints
Introduction
Standard Taper Ground Glass Joints
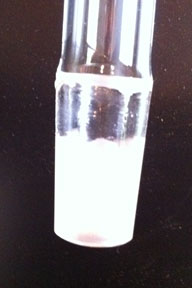
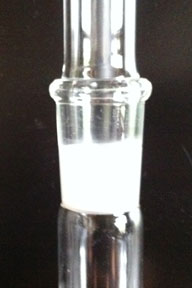
These are the most widely used form of ground glass joint (they can also be made out of quartz, steel etc.). The frosted, precision-ground glass surfaces make a good seal when properly greased and are extremely versatile. On the left we see a "male" (or "inner") joint and on the right a "female" (or "outer") joint. When the joint is assembled, the inner one fits completely and snugly into the outer one as shown further down this page:
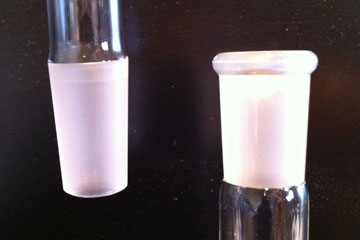
The joint size is described by a number of the form xx/yy. The first number denotes the outside diameter of the top of the tapered male joint (or inside diameter of the top of the female joint) and the second number denotes the length of the joint. For example, a 14/20 joint (pronounced "fourteen-twenty") is 14 mm wide at the top and is 20 mm long. 19/22 and 24/40 (shown above) are two other very common joint sizes.<
As each joint has a standard taper, any two joints with the same outside diameter can fit into each other as long as the apparatus to which they are attached does not interfere. For example, a 14/35 joint on a condenser will fit into a 14/20 flask but the ground glass joint will protrude (35 - 20) 15 mm into the flask.
Note:
- These joint sizes apply to U.S. glassware only.
- Separation funnels and volumetric flasks typically use a "stopper" size, not standard taper joints. The two types are not interchangeable. A few enlightened manufacturers do sell such equipment with standard taper joints. When in doubt, look for the standard taper symbol on the glassware:

One drawback to standard taper joints is that they may sieze or "freeze". This usually happens when the joint is not properly greased (see below) or material is caught between the two halves of the joint. Your local glassblower can help [read these stuck joint tips if you don't have a glassblower].
Securing Assembled Standard Taper Joints
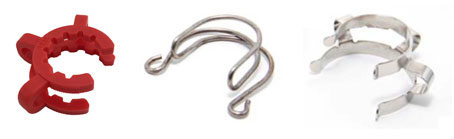
>de protection against accidental separation of the joint while in use (potentially exposing your reaction to air or releasing the contents to the laboratory), the assembled apparatus should ideally be secured with joint clips. Most laboratories these days use Keck™-style plastic clips which snap over the joint and hold the connection firmly in place. The connection is strong and secure, but will yield under pressure so as not to create an explosion hazard. The only drawback to these plastic clips is that they are unsuitable for temperatures above ~ 130 °C as they will start to melt. Clips are sized to a particular joint diameter, so if you lab uses 14/20, 19/22 and 24/40 equipment you will need to purchase three different size clips. Our retail division, Safety Emporium, offers nine different sizes of plastic clips at competitive prices.
Metal Keck™-style clips are also available. These work identically to the plastic clips and will withstand higher temperatures, however they run the risk of scoring and scratching the joint. They are also more expensive (but more durable) than plastic clips.
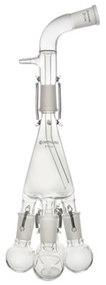
Some joints come with hooks or "ears" on the joint body which allow one to use springs to connect the joints to each other. If only one of the two mating components has ears, one can sometimes use longer springs or rubber bands by hooking onto one ear, wrapping those around an arm of the un-eared component, and hooking the end onto the other ear. Rubber bands are cheap, but tend to wear out readily and are not suitable for high temperatures. Springs can get overstretched, but will last a long time with proper care. When using either springs or rubber bands on these connections, there is a risk that if the assembled joint blows open due to sudden pressure, the two components can snap back together forcefully, potentially breaking the apparatus, so if you anticipate a pressure situation, a Keck clip might be a better choice.
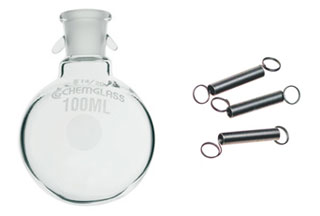
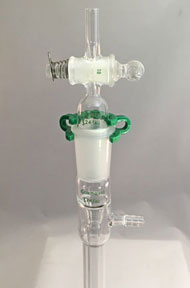
Springs generally have more holding power than plastic Keck™ clips if the joint needs to support weight (for example, if one is suspending a storage vessel to a vacuum line). Our retail division, Safety Emporium, offers springs as well as hooked joints, flasks and adapters. On the right, we see a distillation receiver that is equipped with springs.
Greasing Standard Taper Joints
A common question is "Do I need to grease these standard taper joints?" If you are doing simple organic chemistry and you are not heating the material, then the answer is generally "No." But if you plan to heat your materials, you need to make sure that air and water are excluded from the system, and/or you want to make sure the joint does not freeze, then you must do so.
The grease you select will depend on the nature of your experiment. For routine work, a simple silicone grease will be fine. For high vacuum applications, more expensive greases such as Apiezon H or M grease should be used.
To grease a joint, first make sure that both the inner and outer halves are completely clean and free of old grease or particulate matter. The ground glass should be clean and frosty in appearance; if not, wipe them with a clean KimWipe that has been moistened with hexane, petroleum ether or a similar solvent.
Apply a small dab of grease about the size of a pea to your fingertip and then smear an even band around the top half of the inner joint only. By keeping the grease in the top half of the joint you reduce the chances of contaminating your reaction mixture with excessive amounts of grease. Slide the greased inner joint into the outer one. Fit them together snugly and rotate them slightly until you have a clear band of grease that has no streak or bubbles. If you can't work out any streaks/bubbles with additional rotation/wiggling, take the joint apart, clean both halves completely and start over. Adding more grease to a streaked joint is usually not worth the effort.
If you plan on heating or refluxing your material, recognize that the grease will slowly dissolve away into your reaction vessel. If you will be distilling the material this may not matter, but if not and you have a material that has solubility characteristics similar to grease or a reaction that needs to run for several days, then you may need to rethink your approach. Solutions include keeping your system under positive pressure and substituting PTFE (i.e. Teflontm) sleeves or Teflon tape for grease. We recently learned of another alternative, the Glindemann sealing ring, which is a narrow PTFE ring that is supposed to fit better than a conventional joint sleeve or Teflon tape.
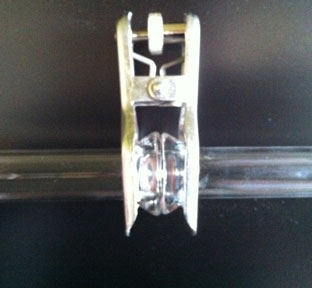
Ball and Socket Joints
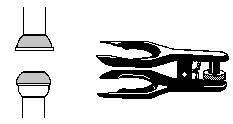
Ball and socket joints are commonly used when the pieces being joined need some "play" or flexibility. These are quite common on the traps of vacuum manifolds because of the difficulty of aligning the two components. On the left we see the socket on top and the ball on the bottom. On the right is a pinchclamp (available at Safety Emporium) that is used to hold the two components together.
The joint size is described by a number of the form xx/yy. The first number denotes the width of the ball and the second number denotes the interior bore of the joint. For example, a 12/2 joint has a 12 mm ball and with a 2 mm hole.
The instructions for greasing a ball and socket joint are the same as those listed for greasing a standard taper joint.
Yes, your leg and hip form a ball and socket joint, but hopefully yours are not made out of glass!
O-ring Joints
O-ring joints consist of two grooved flanges between which is placed a single rubber or Viton O-ring. O-ring joints are sized according to the interior bore of the joint (not the diameter of the groove or O-ring). For example, a #15 O-ring joint has an interior bore of 15mm. Like ball and socket joints, O-ring joints must be held together with a pinch clamp.
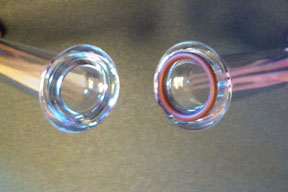

O-rings have distinct advantages over standard taper joints in that they are unlikely to leach grease into a reaction mixture and they are virtually incapable of siezing. However, O-ring materials can degrade when used with certain solvents or subjected to high temperatures (think about the Challenger disaster).
O-ring joints should not be greased, however the O-ring itself should be treated with an extremely thin coating of grease. A good way to do this is to simply rub your nose with your thumb and forefinger and then rub the O-ring (honest. No kidding). Alternatively, Apiezon M grease is a good choice. When assembling an O-ring joint, be careful that no hairs or fibers stick to the O-ring as these will cause a vacuum leak. Also make certain that the O-ring is correctly sized and fully seated in the groove. It never hurts to have spare o-rings on hand.