 |
 Safety Emporium is a proud sponsor of this site. |
 |
Home Page --> Designing The Glassblowing Shop
|
|
Safety Emporium is a proud sponsor of this site. |
|
Home Page --> Designing The Glassblowing Shop
|
Designing a new or renovating an existing glassblowing facility can be a rewarding and satisfying experience or a frustrating and intimating process. The design thought processes outlined here may help you in your quest for a modern, efficient and functional glass shop. Detailed and organized information on your facility and operations, communicated to your building committee representative or architect, will help you and the architect produce the best plan for your needs.
Start with the location. Who will this shop serve? This may seem to be a simple question, but the answer may influence the shop location within the building. If your customer base is primarily from one source (the building you reside in) then access by customers from outside the building may not be of concern. The shop can be located away from the main or high traffic areas because your customers will know where you are.
Conversely, if your customer base covers a campus or large geographical area, then a location within your building that has higher visibility and easy access will be beneficial.
Other factors in selecting your shop location (if that's even a choice) will be the availability of facility services required by your operation, compatibility with surrounding laboratories and offices, HVAC logistics, and priority assignment within your organization.
One of the most important steps in planning a new shop is understanding what you do, how you do it and where you do it. Dividing the glass shop into functional zones is the first step in the process of creating an efficient and safe work area. It also is an opportunity to review the interaction between zone functions.
Once the zone areas have been identified, you will need to document the services required for each zone. Electrical requirements, gases, communications, HVAC, and other facility-provided services need to be identified.
Once the number of zones and their functions have been identified, the layout of these zones will determine how efficient and functional your facility will be. Be sure adjacent zones complement each other.
Documentation of all equipment requirements is often the single most forgotten item to be forwarded to the architects, and therefore the single most frustrating step of the move-in process. It is hard to plug in a 220 V annealing oven when the blueprints call for a 110V outlet, the lathe really measures 7 feet in length, not 6 1/2 feet like you thought, or the cut-off saw does not have cold water or a drain within 20 feet of its location. Be sure to allow for adequate work and service space around your equipment.
Create an equipment data list that includes all services needed to run and use the equipment. This list should include at a minimum:
Your floor plan should take into account room size and configuration, new/existing equipment dimensions, work surfaces, storage cabinet styles and dimensions, service requirements, and zone functions and interactions within the room. You now have the information necessary to put your shop together.
A successful floor plan allows safe and efficient use of space, movement and function within the space allocated to your facility. The typical planning process would layout the zones within room configuration and arrange equipment/ furniture within the each zone.
When at all possible, try to envision multi-use functions for every piece of furniture and space. Storage cabinets can function as barriers or dividers to keep customers away from potentially dangerous zones or to guide them to a consulting area. Work surfaces function as staging areas for incoming, in-process and outgoing glasswork. The dead space between banks of back to back cabinets offers additional storage space for those odd shaped items that do not fit easily in drawers or cupboards. Utilize vertical and horizontal space. Details are important at this stage. Locations of all services, furniture and equipment orientation should be specified.
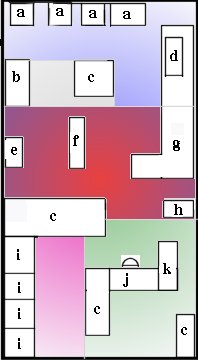
Here is an example of the floor plans and zones developed for a new glassblowing shop in East Carolina University's Science and Technology Building. You can compare these plans to photographs of the completed facility to assist in your visualization:
| Zone Placement | Key | Floor Plan |
|---|---|---|
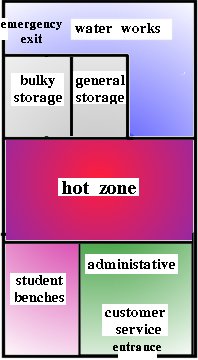 |
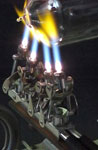
Photo Tour of ECU's Glassblowing Facility
|
 |
This is the glassblowing business administration and customer interaction area. This should be located at entrance to the glassblowing shop. For customer safety, storage cabinets, desk/work stations and furniture should be arranged in a manner to block easy access to the Hot Zone. Provide an area for customer work pick-up. Line-of-sight visibility between Customer Service and the Hot Zone and Student Bench area should be maintained for communication and safety in a one-person shop like this.
Requirements: Desk, communication center (telephone, computer, data connections) storage, file drawer(s), book case, electric (110V), emergency gas shut-off valves.
This is the area where the hot working or forming of glass takes place. Work surfaces will be exposed to gas/hydrogen oxygen flames and hot glass. Storage areas for glass working tools and related equipment should be laid out. The annealing oven, glassblowers work bench area and lathe will be located in this zone. Line-of-sight visibility between the Hot Zone and the Customer Service and Student Bench areas should be maintained for communication and safety.
Requirements: Hydrogen, propane or natural gas (at least 5 psi), oxygen, compressed air or nitrogen. Fuel gas and oxygen delivery lines to be at least 1/2 inch ID (preferably larger) with high flow regulators and valves. House vacuum if available. Electricity - 110V and 220V (208V future connection). An exhaust canopy (controlled by switch) over lathe and glassblowers bench [your HVAC experts will weigh in on this, too]. The glassblowers workbench should consist of standing height cabinet units with smooth, flat work surfaces and background, flat black in color.
Be sure to lay out the lathe, glassblowers bench and annealing oven to allow easy access to each and facilitate interaction between equipment.
Here is where you locate all of your glass working equipment that requires water or drains. These tools include the cut-off saw, belt sander, lapping wheel, drill press and special glass washing sink. This area may be considered a "dirty" area because of water spray, abrasive compounds used during processing, and some chemical processes using solvents and acids (including Hydrofluoric Acid).
Requirements: Hot and cold water, distilled or deionized water, drains, safety shower/eyewash station, compressed air, house vacuum. Specify separate storage cabinets for acids and flammable solvents. Consider secondary containment where necessary.
Other considerations are:
Bulky storage will accommodate boxes of glass tubing of various height and width dimensions, but with a fairly consistent depth of four to five feet.
Requirements: Open rack style platform. Approximate floor space to be 10 feet in width x five foot depth x eight feet high. The unit should have shelves spaced 16 inches apart.
Other storage will be spread throughout the facility. Cabinet design and configuration to be placed for optimum multi-purpose use. All floor cabinets to be standing height with standard laboratory work surfaces except where noted on specification sheet.
110 V electric service should be sufficient in this zone.
Four student glassblowing benches will be located here. This is an area where the hot working or forming of glass takes place so the work surfaces will be exposed to gas/oxygen flames and hot glass. It will require storage areas for glass working tools and related equipment. Line-of-sight visibility between the Hot Zone and the Customer Service and Student Bench areas should be maintained for communication and safety.
Requirements: Propane or natural gas (at least 5 psi), oxygen, compressed air or nitrogen. Fuel gas and oxygen delivery lines should be at least 1/2 inch ID with high flow regulators and valves.
110 V electricity should suffice, an exhaust canopy (controlled by switch) over benches is ideal if your HVAC design permits it.
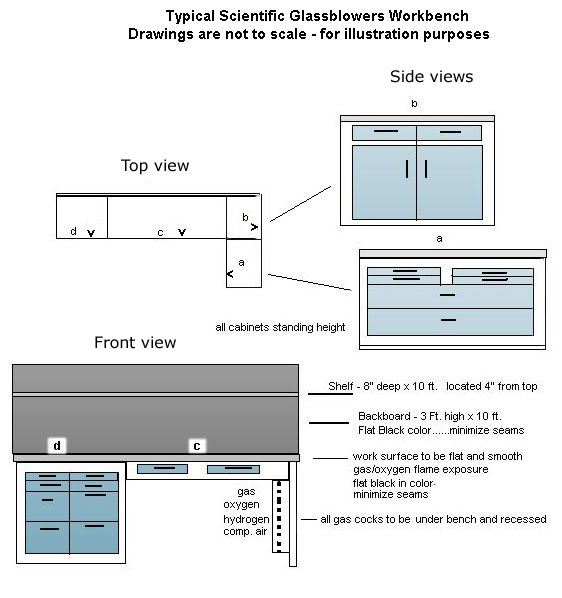
The workbenches should consist of standing height cabinet units with smooth, flat work surfaces and background, flat black in color.
Your workstations and other vital areas will be defined by the casework that you request when submitting your plans. See the discussion of casework layout found throughout this document and the shop tour page for examples.
For the main glassblower's station, this is a design that I came up with: