thumbnail image of a glass lathe burner
Safety Emporium is a proud sponsor of this site.
thumbnail image of a scientific glassblower at work
The Scientific Glassblowing Learning Center
Home Page --> Tutorial Lesson 5, Burners and Torches


Tutorial Lesson 5, Burners and Torches
Lesson 4
(Oxygen and Fuel Gas Systems)
Lesson 6
(Cutting Glass)

Burners and Torches

Torches and burners are described as being surface-mix or pre-mix. The difference is where the mixing of the fuel gas and oxygen take place. Remember, your torch will be burning oxygen and propane or natural gas. Do not use torch components designed for use with air.

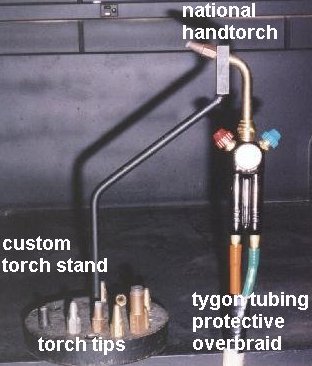
Pre-mix torches as a rule are capable of burning a little hotter with a flame that can be very concentrated. Gas and oxygen are mixed in a chamber within the torch body. This style torch is preferred when making seals and/or when  heating small concentrated areas. If you were to be restricted to using only one torch, the pre-mix is recommended. Premix torches have the benefit of having interchangeable tips, allowing the user the option of changing flame characteristics over a broad range. A torch used quite extensively in the industry is the National Handtorch Type 3A Blowpipe shown here. This relatively inexpensive torch, with tip sizes #2, 3, 4,and 5 will cover most of your needs.

torch picture

Surface-mix torches and burners are used most frequently when large areas of glass need to be worked. Oxygen and fuel gases are mixed at the torch tip. The flame characteristics tend to be broader and softer, with less velocity than a comparable sized flame from the pre-mix torch. This is a good torch to use when preheating a large piece of glass apparatus for repair, or when shaping large tubing. An excellent example of a burner that incorporates surface-mix and pre-mix capabilities would be the Carlisle CC Burner.

There are many other makes and models of burners and torches available to the glassblower. Their different flame and body characteristics determine their application in the glassblowing field.

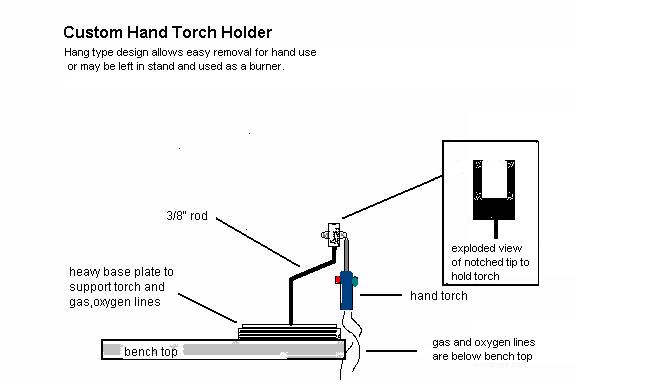
Torches (handheld) may be used as burners by simply hanging or attaching them to some sort of fixture. This fixture may be something as simple as a ring-stand and clamp assembly or a custom made unit that will hold the torch in a safe and secure manner.

Before you start

Handle the tools you will be using. Feel their weight and balance, learn how to hold them in a comfortable manner, and how see how easy/hard it is to open and close valves on your torch and burners. Always wear your safety/didymium glasses when at the work bench.

Review all safety procedures before you plan or start your work. Think out what it is that you will be doing and know what action to take if something happens different than expected. Read through the instruction text to prepare for the exercise. It is best to avoid surprises at this stage of instruction!

Light up

In the following discussion, we will assume that you are using a National Handtorch with a #3 tip. The steps to lighting your torch are:

  1. Confirm gas delivery systems are in safe operating condition. Set the regulator at 5 psi gas and 10 psi oxygen.
  2. Open the gas valve one full turn to purge air from the line and then quickly close the valve.
  3. Repeat step #2 with oxygen.
  4. Open the gas valve approximately 1/4 turn and then ignite the gas with your flint lighter.
  5. The torch is lit! Adjust the gas valve to produce a flame about 3/4" long. This is known as a pilot flame. You may leave the torch flame at this position when not in use - but always attended.

Tip: If you experience difficulty in immediately igniting the gas beware of excessive gas buildup. Shut the gas valve off and wait a few minutes to allow the gas to dissipate. Attempt to light the torch again using a different setting on the gas valve.

Adjusting The Flame Size

The steps to adjusting your flame to the desired shape/size are:

  1. Gas first - open the gas valve to create a flame length about 6" long (about the length of your hand). The flame should be still attached to the torch tip. If there is a space greater than 1/8" between the flame and torch tip adjust (close) the gas valve until the flame "re-attaches" to the tip.
  2. Slowly open the oxygen valve. Observe how the flame changes in shape, velocity and heating characteristics.
  3. Practice flame control by changing the settings on the gas and oxygen valves. Make the smallest flame possible, using an inch long flame as a target. Now attempt to create the largest flame possible. Try different tip sizes to observe the flame size range each produces.

Tip: Take the time to become comfortable handling your torch now. With practice, creating the various flames necessary to produce sound glassblowing seals will become second nature

Bangs, Pops and other Surprises

When you first learn to light a torch and adjust the flame, you will inevitably create some surprisingly loud pops or bangs. Relax, everyone does this. Here's how you handle the problems you might encounter:

  1. If the torch should suddenly bang or pop as a result of improper gas/oxygen mixing, immediately close the gas and oxygen valves at the torch. Re-open the oxygen valve to flush out the mixing chamber in the torch body, extinguishing any flame that may have flashed back into the chamber. This action only takes about 5 seconds. Close the oxygen valve. The torch is now ready to re-light.

  2. If the flame extinguishes itself (improper gas/oxygen mix) and there is no pop or bang, simply close the gas and oxygen valves and then relight the torch.

  3. Flame appears where its not supposed to! A definite safety hazard! Close the supply line valves closest to the torch. Re-check all connections, valves and fittings.

Selecting The Correct Flame Size

Flame sizes are determined by what you are attempting to do with the glass. Only  glass that has been heated to the working point range will be soft enough for you to form into the shapes or seals desired. Heating an area of glass 10 mm in diameter means only 10 mm of glass will be hot enough to to shape or form. Logically it would follow you do not heat an area 30 mm in diameter to seal on a tube that is only 10 mm OD. Match the area of hot glass to the size of the seal.

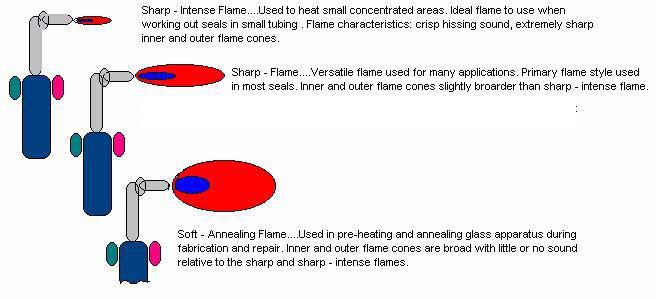
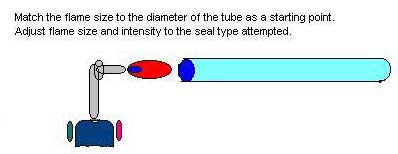
Flame intensity is a factor in determining how quickly the glass reaches working point temperatures. Experience will guide you in choosing the proper flame intensity and flame size to apply to the different types of seals. Each person will develop their own style and technique in using the torch. The information presented here should serve as a starting point.

Shutting Down the Gas Delivery System

To shut down and relieve all positive pressure from the gas delivery system:

  1. Close the valve at the gas source.
  2. Open the valves at the torch and burn off all released gas.
  3. Back off the pressure adjusting screw at the regulator(s).

Tutorial Lesson 5, Burners and Torches
Lesson 4
(Burners and Torches)
Lesson 6
(Cutting Glass)


This page and any associated material is copyright 2002-2024 by Joe Walas and/or ILPI unless otherwise stated. Unauthorized duplication or posting on other web sites is expressly prohibited. Send suggestions and comments (include the URL if applicable) to us by email. CAUTION: Be sure to read this important safety/legal disclaimer regarding the information on this page.