thumbnail image of a glass lathe burner
Safety Emporium is a proud sponsor of this site.
thumbnail image of a scientific glassblower at work
The Scientific Glassblowing Learning Center
Home Page --> Tutorial Lesson 10, Making a Test Tube


Tutorial Lesson 10, Making a Test Tube
Lesson 9
(Annealing)
Lesson 11
(Butt Seals)

Making a Test Tube

Test tubes are relatively easy to make, frequently used, and give you an opportunity to practice rotation and fire polishing skills. This exercise will introduce you to the process of blowing into the glass, forming and shaping the tube end.

  1. Select some 10 to 18 mm OD tubing. A 16 inch length with fire polished ends is a good piece to start with.

  2. Light your torch and adjust the flame to match the tubing diameter.

  3. Grasp the tubing with both hands and start rotating it.

  4. Place the rotating tube in the flame at the halfway (8") point.

  5. When the tube softens (something like a cooked noodle cooked al dente) and constricts to half its original diameter, remove it from the flame, do not stop rotating, and slowly pull the two ends about 6" apart.

  6. Place the tubing back into the flame and burn it off into two equal lengths. This exercise is known as "pulling points". Place the points on the hot glass rest to cool. Reminder: hot glass looks just like cold glass!

    Tip: Roll the glass point (after cooling) on a flat surface. If your rotation is good the glass tube and "point" will be centered with no wobble.

  7. Adjust your flame to a sharp/intense profile.

  8. Place the shoulder of the glass point into the flame at an angle - rotating at all times - and pull off the excess glass, leaving a semi-rounded bottom.

  9. Attach the blowhose assembly to the glass tube.

  10. Reheat the tube bottom to the working point temperature and blow (little puffs), shaping the tube bottom.

  11. Anneal. Remember, a glassblowing job is never complete until the glassware is annealed!

Tip: This is a good time to practice the process of blowing glass. Try different flame and blow pressure  combinations to see how the glass responds. Position the glass tube in different regions or angles of the flame. Glassblowers will use combinations of heat, flame size and angle, gravity and pressure in shaping glass. With  experience you will learn how much or hard to blow air, when to let gravity work for you, and even when to inhale to produce that certain look or shape.

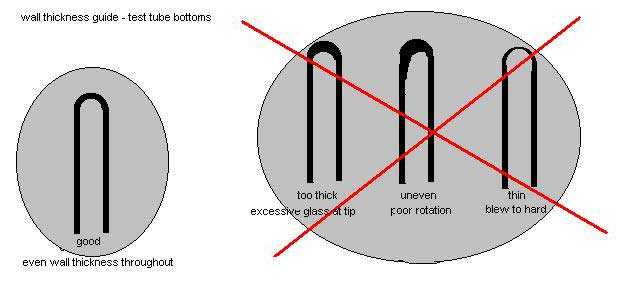
In virtually all cases you should strive to maintain an even wall thickness throughout your glass project. If the glass tube is not rotated or heated evenly the glass wall may become lopsided, thick on one side and thin on the other. It will be difficult to control the glass being worked if the difference in wall thickness is too great. The uneven wall thickness will not heat to the working temperature uniformly, resulting in hot spots (thin wall) that blow out and cold spots (heavy wall) that do not move. Even wall thickness will help you produce structurally sound glass apparatus.

The importance of good rotation should now be apparent!

Tutorial Lesson 10, Making a Test Tube
Lesson 9
(Annealing)
Lesson 11
(Butt Seals)


This page and any associated material is copyright 2002-2024 by Joe Walas and/or ILPI unless otherwise stated. Unauthorized duplication or posting on other web sites is expressly prohibited. Send suggestions and comments (include the URL if applicable) to us by email. CAUTION: Be sure to read this important safety/legal disclaimer regarding the information on this page.