 |
 Safety Emporium is a proud sponsor of this site. |
 |
Home Page --> Miscellaneous Glassblowing Tips and Tricks
|
Miscellaneous Scientific Glassblowing Tips and Tricks
This page is a small collection of glassblowing "secrets" for the glassblower and technician. Many of these glassblowing tips and tricks have been used by scientific glassblowers for years in some form or another. Acknowledgment should be made to The American Scientific Glassblowers Society (ASGS) and its membership. The ASGS has provided via membership contributions to the journal FUSION, video tapes, seminars and symposia the foundation for some of the information presented here:
- Annealing in the Home Shop
- Cutting Flat Glass - Scoring/Scratch Method
- Glass Drills
- General Tips
- Quartz Capillary Seals
- Quartz Sample Collector
- Suck Seals
- Vacuum Formed Quartz Tubes
Also see our Home Page for tips and info that merit an entire page of their own.
Annealing in the Home Shop
Annealing scientific glassware is necessary for practical and safety reasons, and all your work needs to be properly annealed to remove glass stress prior to handing it over to your customers. For those who are getting started with a home shop and do not have immediate access to proper annealing oven, you may find this tip helpful:
Use a kerosene heater as a "temporary annealer". The heater I had used was about the size of a 5 gallon can and was the sole source of heat in the unfinished New England garage where I had my shop. I've placed newly fabricated, water -jacketed flasks with multi-ring seals on top of the kerosene heater to hold until I had a batch of glassware ready for transport to an oven 6 miles away for proper annealing. The heater serves as a transition stage to cooler temperatures, yet produces enough heat to protect the glassware from cold drafts, preventing possible thermal shocks. Note: Be sure you have adequate ventilation when using kerosene heaters.
The Corning Museum of Glass has a web page with an excellent video that demonstrates stress in unannealed and properly annealed objects.
Cutting Flat Glass - Scoring/Scratch Method
Cutting flat plate glass may be easier if you follow these tips. Always wear protective eyeware and gloves!
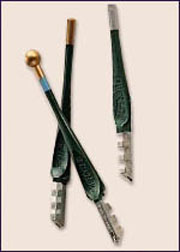
Typical flat glass cutting tools. Photo Credit: The Fletcher Terry Company |
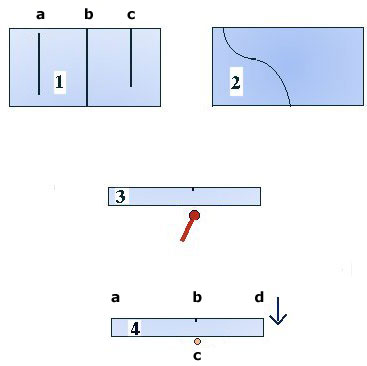
1. Be sure at least one end of your scratch or score goes to the edge of the plate. Line (a) will not break as cleanly as lines (b) and (c). 2. Curved lines can be produced and cut as well. Make one good score by applying even pressure on the glass with the cutting tool. Repeated scoring will not make the glass break easier or produce a clean cut. 3. Wet the scratch with water (a spray bottle will work fine) just prior to breaking. If glass pliers are used, apply them at the edge where the scratch ends. If using the "tap" method, tap on the glass surface opposite the scratch. Start at the scratch end and follow or chase the break across the glass plate. |
4. An alternate way of breaking the glass plate is to place a very small diameter rod (c) under the glass plate opposite side of score (b). Wet the scratch. Holding end (a) firmly down, press down on end (d). If you are attempting to remove a strip of glass less than 25mm in width, it is recommended that glass pliers or the "tap" method be used. Cutting tools come in different forms and wheel angles. Wheel angle guidelines are 130-140° for window (float) glass and 88-114° for borosilicate glasses. |
|
Fletcher-Terry Company has additional information on glass cutting wheels. Also check out their white paper, The Principles of Glass Cutting.
Glass Drills
Holes in glass plate are traditionally cut using water cooled diamond core drills or metal cylinder "cookie cutters" used with an abrasive slurry. The following tool is an inexpensive way of cutting holes using a glass drill. This is also a good method to cut windows for sealing into glass tubing.
|
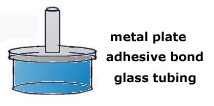 |
Use the same slow speed as in using metal cookie cutters. Start glass drill contact slowly without much downward pressure. Allow for equal material loss from the glass drill as in the glass plate being drilled.
Quartz - General Tips
Quartz working characteristics are very different from those of borosilicate glasses. Quartz will not flow in the same manner as borosilicate glass, so a different approach may have to be taken when attempting certain seals.
- Use a small diameter rod (2 mm) to seal any holes that may appear in your seal. Attempts at sewing the hole shut with a tungsten pick (as you might with borosilicate glass) do not usually produce satisfactory results.
- Develop skills in using lathe speed (centrifugal force) to form large quartz seals.
- Proper preparation of the quartz prior to sealing is critical. Prefab all quartz pieces to the proper dimensions.
- Keeping the quartz clean at every step will aid in the aesthetic quality of the finished piece.
- Be sure the quartz seal is heated completely through. Probably more fabrication seal failures occur from incomplete heat penetration throughout the seal than any other cause. Boxes made from quartz plate are frequently constructed using two torches - simultaneously heating the inside and outside corners during the fabrication process.
- Hydrogen and oxygen gases should be used for most quartz working, though propane and oxygen may be used on smaller diameters or thin quartz plate.
- The white haze or bloom seen on quartz surfaces after flame working can be minimized by proper pre-seal preparation. Clean quartz, preheating a large area around the seal, and properly adjusting the flame composition will help minimize the bloom. Adjust the flame angle to "brush" the quartz bloom away from the main body of your quartzware.
- Baths containing dilute HF Acid/Ammonium Bifluoride and other chemicals are commonly used for cleaning quartz and reducing "bloom". EXTREME CARE should be used and all safety precautions taken before attempting any acid wash. Review this process with your safety representative before use.
Quartz Capillary Seals
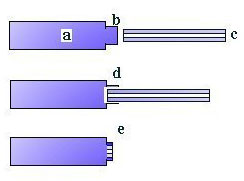
Attaching quartz capillary of very small internal diameter (<1mm) to a larger quartz tube with minimal change in the capillary dimension can be difficult. The method below is one way to make this seal. The seal was developed to meet the need for numerous quartz nozzles that required a consistent non-tapered .75mm opening over a path length of 5 mm.
- Blow out (b) hole in tube (a) slightly larger then the capillary tube (c) OD.
- Insert capillary (c) into tube (a).
- Direct torch flame at point (d), sealing the blowout (b) wall onto the capillary.
- Cut to length.
This seal can be used on borosilicate and other glasses as well.
Quartz Sample Collector
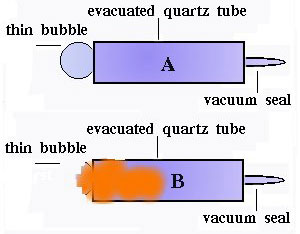
Problem: A method to gather molten metal core samples from a pilot plant scale furnace was needed.
Solution: An evacuated quartz ampoule with thin "break away" bulb.
- Attach small tube to quartz tube (A). Blow thin bubble. Pull vacuum and seal off.
- Ampoule, attached to a plunger, is rapidly inserted to predetermined collection point in molten metal. Thin bulb "implodes" under vacuum/heat environment, collecting sample.
This type of sample collector can be easily modified by using other types of glass and methods of breaking glass bulb.
Suck Seals
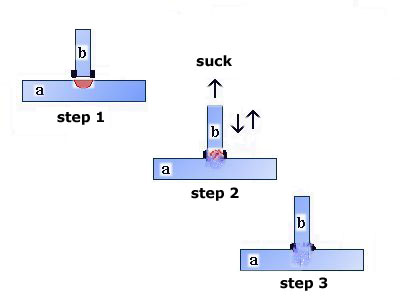
The "suck seals" shown below are a quick way to make a "T" seal on a piece of apparatus. Properly made, this seal is strong and durable. However, if you have the choice, the traditional way of making a "T"seal is the preferred method.
Step 1
- Thicken the wall on tube b - maintaining or slightly increasing the ID.
- Heat an area of tube a about the same diameter as the ID of tube b.
- Remove some of the heated glass - leaving a very thin wall section.
Step 2
- While heating the end of tube b and a, quickly bring tube b down onto tube a making full contact. Then suck in quickly, causing the glass bubble to burst, and pull up on tube b.
- This step has to be done quickly! The bubble does not burst if allowed to cool or if the glass wall is too thick.
- Be sure to pull up on tube b while the glass is still soft to create a smooth even seal.
Step 3
- Finish the product by annealing it properly.
Vacuum Formed Quartz Tubes
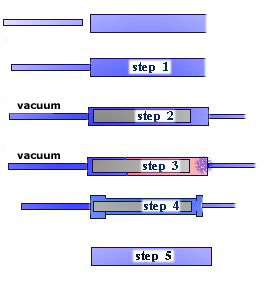
The following method is a relatively inexpensive way to make small quantities of hard to find or special diameter quartz tubing. This method may also be used with borosilicate glasses. This procedure requires a lathe and vacuum pump.
Objective: 1/2" OD Quartz tube
Material needed: 10 mm ID x 13 mm OD quartz stock and a machined graphite rod 0.374" diameter
- Cut the quartz starting material approximately 2" longer than the graphite rod. Attach tubing of a smaller diameter which in turn will be attached via swivel and vacuum tubing to the vacuum pump.
- Insert the graphite rod. Close the 10 x 13 tube and attach the holding rod. Evacuate the tubing.
- Apply vacuum and then apply the torch to the far end of the 10 x 13 tubing.
- Slowly and evenly collapse the tube onto the graphite, working toward the vacuum source. You should, with practice, visually see the glass evenly contacting the graphite as you apply the heat.
- After cooling, cut the glass tubing and remove the graphite. If the graphite does not slide out easily, excessive heat may have been applied during the procedure, the graphite is still hot, or the graphite rod has not been machined properly. There may be graphite residue remaining on the ID of the tubing, which is easily removed. Finished tubes can be made within .005 tolerance or better over 12 inch lengths using this method.